How to Install Pallet Feet the Right Way: A Simple Step-by-Step Guide
Installing pallet feet may seem like a small task, but doing it the right way makes a big difference in the stability, strength, and overall performance of your pallets. A properly fitted set of pallet feet helps your pallet stay balanced, reduces wobbling, and ensures the load remains safe during handling and storage.
This guide focuses only on how to install pallet feet, using clear and easy wording so anyone can follow the steps confidently, whether you are working in a warehouse or assembling pallets in a workshop.
Before You Start: Important Checks
Before installing pallet feet, make sure you prepare everything correctly. A few simple checks can save you time and avoid installation issues later.
Inspect the pallet bottom
Turn the pallet upside down and check that the bottom surface is clean and dry. Remove dust, wood chips, or plastic scraps. This helps the feet attach firmly without slipping.
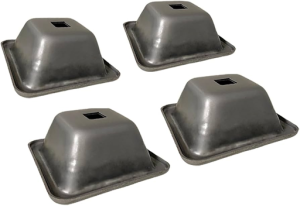
Decide the number of feet you will use
Most pallets use a 9-foot layout, three rows of three feet. Heavy-duty pallets may use more. Decide the layout before you begin so you don’t have to redo your work.
Organise all the tools you need
Depending on the type of pallet foot, you may require:
- Rubber mallet
- Drill and screws
- Measuring tape
- Marker
- Gloves
Push-fit and clip-on feet often need no tools, but screw-on feet must be tightly fixed using a drill.
If you want to understand pallet feet in more depth before installation, you can read the full guide on what pallet feet are and how they improve warehouse storage.
Step-by-Step Guide to Installing Pallet Feet
The steps below apply to push-fit, clip-on, and screw-on pallet feet. Follow the method that matches the type you are installing.
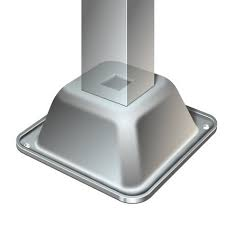
Step 1: Turn the Pallet Upside Down and Prepare the Base
Place the pallet on a flat, clean surface and flip it upside down. This gives you full access to the bottom area where the feet will be attached.
Make sure the pallet is stable so it doesn’t move while you’re working. If you are installing feet on multiple pallets, arrange a workspace where all pallets can be placed neatly without clutter.
Step 2: Mark the Exact Positions for Each Foot
Accurate placement is important because it ensures the pallet stays balanced under load.
Use a marker to mark the following:
- Four corner points
- Middle of each side
- Centre position
This creates the standard 9-foot grid.
If your pallet uses more than nine feet, mark additional positions along the centre beams. Make sure the spacing is even; uneven spacing can cause imbalanced weight distribution.
Step 3: Align Each Pallet Foot on Its Marked Spot
Place each pallet foot on its marked location before attaching anything. This gives you a chance to:
- Confirm spacing
- Check alignment
- Make sure every foot is positioned symmetrically
A quick layout check prevents mistakes once you start fitting the feet.
Step 4: Install the Pallet Feet Based on Their Type
Now you’re ready to attach each foot securely. Choose the method below based on the type of feet you are working with.
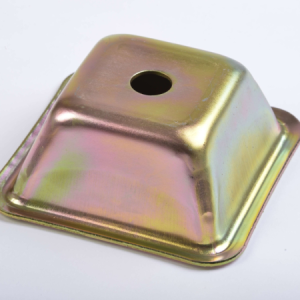
Installing Push-Fit / Press-Fit Pallet Feet
These are the easiest to install. They simply push into the pallet’s moulded or drilled sockets.
Steps:
- Place the foot on the marked position.
- Align the foot’s connector with the socket or fitting groove.
- Press down firmly using both hands.
- If needed, tap gently with a rubber mallet to lock it into place.
- Check that the foot sits tightly and does not rotate or wiggle.
Push-fit feet should “snap” or secure tightly once seated correctly.
Installing Clip-On Pallet Feet
Clip-on feet attach around the edges or beams of the pallet.
Steps:
- Hold the foot against the marked area.
- Position the clip so it lines up perfectly with the pallet edge.
- Apply firm pressure until the clip locks in place.
- Listen for a click or feel the foot snap into position.
- Pull lightly to confirm it is fully secured.
If a clip-on foot feels loose, remove it and clip it again more firmly.
Installing Screw-On or Bolt-On Pallet Feet
These offer the strongest hold and are commonly used for heavy loads.
Steps:
- Position the foot in the correct spot and hold it steady.
- Mark screw hole positions if needed.
- Drill small pilot holes; this prevents the wood or plastic from cracking.
- Insert screws into each hole and tighten them one by one.
- Do not overtighten this can strip threads or damage the foot.
- Check the foot to make sure it is sitting flat and firmly fixed.
Bolt-on feet may require washers depending on your pallet material.
Step 5: Check the Alignment of All Installed Feet
Once all pallet feet are attached, place the pallet upright and check the following:
- Is the pallet level on the floor?
- Do all feet touch the ground evenly?
- Is any foot loose or uneven?
- Are all rows of feet aligned correctly?
If anything looks off, turn the pallet back over and fix it before loading any weight.
Step 6: Test the Pallet With a Light Load
Before placing heavy goods, always start with a light load. This is an important safety check.
Place a small box or weight on the pallet and observe:
- Does the pallet remain stable?
- Do any feet bend, shift, or creak?
- Does the pallet stay balanced on all sides?
If everything feels firm and steady, your installation is successful. Also, if you need durable and easy-to-install pallet feet, Kirmell offers strong and affordable options suitable for all pallet types. Browse through our collection and order right now.
Helpful Pallet Foot Installation Tips for a Smooth and Safe Setup
To make your pallet foot installation process easier, safer, and more reliable, keep these simple but important tips in mind:
Install pallet feet on a clean and dry pallet base
Before starting, always clean the underside of the pallet. Dust, dirt, or moisture can stop the pallet feet from locking or gripping properly. A clean surface ensures the feet sit flat, attach firmly, and stay secure for long-term use.
Use a rubber mallet for fitting pallet feet
If you are installing push-fit or clip-on pallet feet, avoid metal hammers. A rubber mallet gives you enough force to secure the foot without cracking the plastic or damaging the pallet. This helps achieve a tight fit while keeping the material safe.
Follow a symmetrical pallet foot layout
Whether you’re using a 9-foot or 12-foot pattern, always install pallet feet in a balanced and even layout. A symmetrical pattern ensures the pallet stays stable under load, prevents wobbling, and distributes weight equally across all feet.
Replace damaged pallet feet immediately
Never install new feet around broken or cracked pallet feet. This creates uneven support and increases the risk of tipping or load failure. Always remove damaged feet first and replace them with matching, compatible ones.
Wear gloves during pallet foot installation
Gloves help you maintain a firm grip on the pallet feet and protect your hands from sharp pallet edges or drill slips. This is especially helpful when working with screw-on or bolt-on pallet feet that require more handling.
Check pallet and pallet foot compatibility
Each pallet design may require a specific foot size or fitting style. Always make sure the pallet feet you are installing match the pallet model. Using incompatible feet can cause loose-fitting, instability, or long-term wear issues.
Always check compatibility before installation. Kirmell pallet feet come in multiple sizes and designs, making it easy to find the right fit for your pallet. Explore our collection to see which one suits your needs.
For more information on compatibility, read the detailed guide on steel vs plastic pallet feet.
Common Pallet Foot Installation Mistakes to Avoid
Avoiding these frequent pallet foot installation mistakes will help you achieve a secure, stable, and long-lasting pallet setup.
Not measuring or marking pallet foot positions
Skipping measurements can lead to uneven spacing, misaligned feet, and poor weight distribution. Always mark exact positions before installation to maintain a consistent layout.
Mixing different types of pallet feet on one pallet
Using clip-on, screw-on, or push-fit feet together creates an uneven base. This leads to an imbalance during stacking or moving. Always use the same type and size of pallet feet across the entire pallet.
Incorrect spacing between pallet feet
Feet placed too close or too far apart weaken the pallet structure. Proper spacing ensures the load weight spreads evenly and prevents the pallet from sagging in the middle.
Over-tightening screws on screw-on pallet feet
When installing screw-on feet, tightening screws too much can crack the plastic, strip the threads, or damage the pallet base. Tighten only until the foot sits firm and flat; no extra force is needed.
Forgetting to test the pallet after installation
Many people skip the testing step. Always test with a light load first to check for wobbling, bending, or loose feet. This helps you catch installation errors before adding heavy goods.
Attaching pallet feet too close to the edges
Feet installed too close to pallet edges may not support the weight properly and can break under pressure. Always place the feet slightly inward from the edge to maintain strength and stability.
Installing pallet feet on a damaged pallet base
If the pallet bottom is cracked, warped, or weakened, the pallet feet cannot lock properly. Always repair or replace the pallet before installing new feet to ensure safety and durability.
Buy Kirmell Pallet Feet for Strong, Easy and Reliable Installation
If you are looking for pallet feet that are durable, easy to install, and suitable for different pallet styles, Kirmell offers a trusted range you can count on. Our pallet feet are designed to fit securely, provide strong support, and help keep your pallets stable during storage and movement. Whether you use clip-on, push-fit, or screw-on styles, Kirmell pallet feet are made to deliver long-lasting performance in warehouses, workshops, and commercial facilities.
Kirmell also offers guidance on choosing the right pallet feet for your load, layout, and pallet type, making installation even easier. If you want to order pallet feet or need help selecting the correct model for your pallet setup, you can contact us or place your order with Kirmell today.
Conclusion
Installing pallet feet correctly is an easy task, but it must be done with care. Proper placement, correct tools, and secure fitting all play a major role in creating a stable and reliable pallet. By following the steps in this guide, you can install pallet feet neatly, safely, and without any complications, whether you’re handling push-fit, clip-on, or screw-on designs.
FAQs
Where can I buy strong and reliable pallet feet?
How do I know if I’m placing the pallet feet in the correct position?
Do I need tools to install pallet feet?
What should I do if a pallet foot feels loose after installation?
Can I mix different types of pallet feet on one pallet?
Why should I test the pallet after installing the feet?