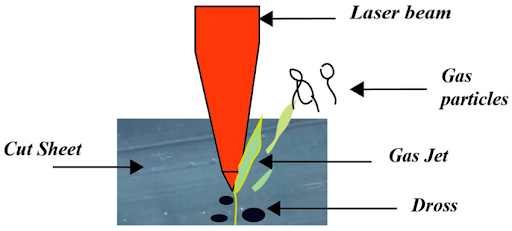
What Is Dross in Laser Cutting and How Do You Remove It?
Dross is the unwanted, re-solidified metal that sticks to the edge of a cut most often on the underside of a laser-cut part. When the laser melts the material, the assist gas (like nitrogen, oxygen, or air) should blow that molten metal out of the kerf (the cut gap). If the melt doesn’t fully eject, it cools and hardens into rough beads, bumps, or a crusty line along the cut edge.
People also call it “slag” in some shops, especially when talking about thermal cutting in general. But in laser cutting, “dross” is the common term for that stuck, melted residue.
Why Dross Happens During the Laser Cutting Process?
Dross is rarely “just one thing.” It’s usually a mix of settings, material, and machine condition working against you. These are the most common causes:
1. Cutting Speed Is Off
- Too fast: The laser doesn’t have enough time to fully melt through, so the melt becomes sticky and doesn’t blow out cleanly.
- Too slow: You put too much heat into the cut. The metal gets overly molten and can “wash” back onto the edge and freeze there.
2. Power And Focus Aren’t Matched To The Job
If the power is too low, the cut is incomplete and leaves heavy residue. If the focus position is wrong, energy density drops and the melt flow becomes messy.
3. Assist Gas Problems (Type, Pressure, Purity, Or Flow)
Assist gas is not optional; it’s the “broom” that clears molten metal out of the cut. Low pressure, leaks, wrong nozzle size, or poor gas choice can leave dross behind.
4. Nozzle Height, Alignment, And Worn Parts
A worn nozzle, incorrect standoff distance, or misalignment can disturb gas flow and push melt the wrong way. Even a dirty lens can reduce cutting efficiency and increase residue.
5. Material And Surface Condition
Rust, mill scale, paint, heavy oxidation, or protective film can change how heat spreads and how the molten pool behaves, making dross more likely.
If you’re seeing dross regularly, it’s often a sign of deeper setup issues here are the top laser cutting mistakes that could ruin your custom parts order and how to avoid them.
Different metals and finishes behave very differently under heat, which is why choosing the right material matters as much as machine settings. See the guide: What materials can be laser cut?

What Dross Looks Like (So You Can Spot It Fast)
Common signs:
- A hard bead line on the underside edge
- Small bumps that make parts not sit flat
- Rough edges that snag gloves or fail inspection
- Extra cleanup time before welding, painting, or powder coating
A simple test: run a fingernail along the bottom edge. If it catches, you likely have dross (or burr) that needs removal.
Why Dross Matters (More Than Just Ugly Edges)
Dross causes real shop problems:
- Parts may not fit into jigs or assemblies
- Weld prep takes longer, and weld quality can suffer
- Coating adhesion can be worse if residue is left behind
- Edges become safety hazards for handling
- Overall production cost increases because the cleanup is slow
How To Remove Dross From Laser Cut Parts
There isn’t one “magic” method. The best choice depends on how thick the dross is, how many parts you have, and what finish you need.
1. Quick Manual Knock-Off (Best For Light Dross)
Use:
- A scraper, flat chisel, or putty-knife style tool
- A light hammer tap (carefully) if it’s brittle
This is fast when the dross is thin and poorly bonded.
2. Wire Brushing (For Thin, Flaky Residue)
A hand wire brush works for small batches. For bigger work:
- Bench wire wheel
- Angle grinder with a wire cup
This is common for mild steel parts where the dross is light.
3. Grinding Or Flap Disc (For Stubborn Dross)
Use an angle grinder with:
- Flap disc (good control and smoother finish)
- Grinding wheel (aggressive, but can gouge if you rush)
Tips:
- Keep the tool moving to avoid heat marks
- Use light pressure—let the abrasive do the work
4. Deburring Tools And Edge Finishing (For Precision Parts)
Hand deburring tools can remove small edge lip and help “break” sharp edges after dross is removed useful for stainless and thin sheet.
5. Tumbling Or Vibratory Finishing (Best For Many Small Parts)
If you have lots of small components, tumbling can remove small burrs and improve edge feel with a consistent finish. It’s widely used as a post-process for laser-cut parts.
6. Abrasive Blasting (Great For Complex Shapes)
Sandblasting or bead blasting can clean edges and hard-to-reach areas, especially on parts with lots of holes or profiles. It’s also good when you want a uniform surface before coating.
7. Chemical Removal (Use Carefully)
Some shops soak parts in solutions to loosen scale or residue. If you go this route, treat it as a controlled process with proper PPE, ventilation, and material compatibility checks.
The most cost-effective approach is usually: prevent most of it at the machine, then use the lightest cleanup method needed.
How To Prevent Dross In The First Place
Most dross problems are fixed by dialling in the cut, not by “better grinding.” Use this checklist:
Verify Basics
- Clean lens and protective window
- Check the nozzle for wear and spatter
- Confirm the nozzle is centred and aligned
- Ensure stable gas pressure and no leaks
Tune Speed And Power Together
A good practical approach:
- If you see heavy dross and an incomplete cut, slightly increase power or reduce speed
- If you see overheating and a messy edge, increase speed or reduce power
Small changes matter; move in steps, not huge jumps.
Check Focus Position
Focus that’s too high or too low shifts where energy is strongest. That changes the melt flow and gas-clearing ability. Focus issues are a common hidden cause of persistent dross.
Match Assist Gas To The Material
Gas choice affects oxidation, edge quality, and how the melt is expelled. Use your machine maker’s or material supplier’s recommended starting settings, then fine-tune.
Special Note: Aluminium Cuts And Sticky Residue
Aluminium can be trickier than steel because it reflects heat differently and forms tough oxides. Many shops use nitrogen or high-pressure air to help produce cleaner edges and reduce oxidation compared to oxygen on certain aluminium alloys.
How Is This Different From Plasma Cutting Dross?
Both laser and plasma are thermal cutting methods, so both can leave melted residue. But plasma cutting often shows different “types” of dross depending on speed. Too fast can create spatter and roughness, while too slow can create heavier, more attached dross. Torch height, consumables, amperage, and speed all play a big role.
If your shop uses both processes, you’ll notice plasma residue is often thicker and more “slag-like,” while laser dross can be a tighter bead line, especially on thinner sheet.
A Simple Troubleshooting Guide
Use this quick guide on the shop floor:
Dross Mainly On The Bottom Edge (Heavy Bead)
- Check speed/power balance
- Increase gas pressure slightly
- Confirm nozzle condition and standoff distance
Rough Edge With Lots Of Spatter
- Inspect nozzle wear and alignment
- Clean optics
- Confirm gas flow quality and stability
Safety Tips When Removing Dross
- Wear eye protection chips can fly during scraping or grinding
- Gloves help, but keep them snug (avoid loose fabric near rotating tools)
- Control dust and sparks (especially around flammables)
- If blasting or using chemicals, use proper ventilation and the right protective gear
Kirmell Laser Cutting Services
At Kirmell, our laser cutting services are focused on delivering clean, accurate parts with smooth edges that are ready for fabrication, welding, or finishing. To tackle dross, we use the correct cutting parameters for each material and thickness, ensuring the right balance of speed, power, focus position, and assist gas pressure so molten metal is properly expelled instead of sticking to the underside.
We also maintain our machines with regular checks on nozzles, lenses, and alignment to keep cut quality consistent across every job. If a project needs extra edge refinement, we apply suitable finishing methods to ensure parts meet the required standard. Want high-quality laser cut components with minimal dross and professional results? Contact Kirmell today to discuss your requirements and get a fast quote.
Conlusion
Dross is hardened leftover molten metal that sticks to laser-cut edges when the melt and gas flow don’t clear the cut properly. The fastest way to deal with it is to prevent it by tuning speed, power, focus, and assist gas and keeping nozzles and optics in good condition.
When dross does show up, remove it with the lightest method that meets your finish needs: scraping and brushing for light residue, grinding for stubborn buildup, tumbling or blasting for batch work, and chemical methods only with the right controls.
FAQs
Can Dross Cause Parts To Fail Quality Inspection?
Does Dross Affect Laser Cut Hole Quality?
Why Does Dross Increase When Cutting Many Sheets In One Shift?
Can Dross Be Reduced By Changing The Nozzle Size?
How Often Should I Change Nozzles To Avoid Dross?
Can Protective Film On Sheet Metal Increase Dross?
Why Does Dross Stick More On Some Material Batches?